Step 1: Logging in
• Login to myHancock from the hancockcollege.edu webpage by selecting the blue myHancock
botton on the top left banner, using your myHancock credentials.
• Click on the ‘Faculty Tools' on the left side bar followed by 'Rosters and Attendance'
then 'Census and Drop Rosters’.

Step 2: Start Viewing your Rosters
You are now on the CRN Listing Page. From this page, you can select which term you
would like to view or select “All Terms” to view all of your rosters available. Use
the dropdown menu which defaults to All Terms to change the term.

In addition to selecting the terms you wish to view, you can also change the columns
around or limit what is visible on your screen. To re-organize the columns, simply
click on a column heading and drag it and drop it in the new location. In the example
below, the “Enrollment Count” column has been moved to the left.

To remove or add columns, use the dropdown on the righthand side of your screen next
to the mini Parthenon. Note that CRN and Course Title cannot be removed from the view.
Step 3: Selecting the CRN For Census Submission
The Drop Roster Summary Screen displays:
- Subject – Course abbreviation
- Title – Title of the course
- CRN – Course requisite number
- Rule ID – 1=Census period 2=Faculty drop period (Student receives a “W”)
- Roster Type – Census or “W” Roster
- Status – Now=submit drop roster “now” and Future= drop period opens soon
- Available – shows the timeframe you’re able to drop for census and the drop period
- Last Submitted – shows if you have submitted your census or drop roster

***You are ONLY able to submit your census if you are submitting within the available
dates. The bold text in a course row illustrates you can submit your census or drop
roster.***
Click on the white space in any column within the row for which you wish to pull up
the roster. TIP: select the available dates for that CRN.
Step 4: Drop Roster Maintenance
You are now at the drop roster maintenance screen for the CRN you selected.

From here you will navigate to the “Action” column and select “Census Faculty Drop”
for the student who was a “No Show”.

Once you have issued an “action” on students who need to be dropped, you will navigate
to the Submit
button (in blue) at the bottom of the page.
Step 5: Confirmation
After selecting submit, you will arrive at the confirmation page. This page will allow
you to review your selected “No Shows” or “Drops” before confirming. Once you have
determined if your selections were accurate, navigate to the bottom corner and select
“Confirm”.

To confirm, you have dropped the students, you’ll see green notification(s) at the
top right of the screen. Please reference the image below.

To confirm you have submitted your census roster, please navigate to the top of the
page and select “Drop Roster Status” near the banner.

Referencing the “Last Submitted” column, you can see date (timestamp) of when you
have last submitted. If you determine additional “No Show” students after submitting,
you can still utilize this process again until the last date listed in the “Available”
within the Census Roster or W roster row***
You will use this process to conduct student drops after census
(These students will receive a W grade)
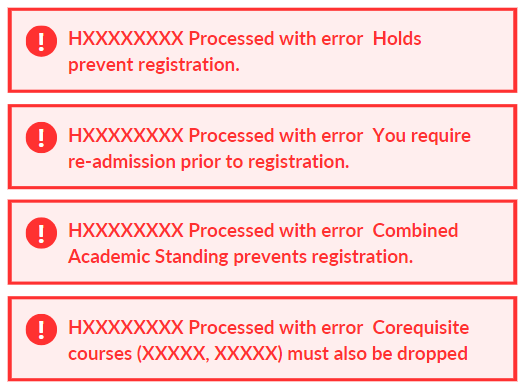
Drop Roster Errors
In certain instances, specific error codes may impede the ability to make modifications
to student accounts, necessitating Admissions and Records overrides. These safeguards
are implemented for various scenarios, including accounts with existing holds, students
who have withdrawn from all classes in the preceding term, triggering a new application
requirement due to a lapse of two primary terms, those on academic probation, and
individuals registered in an attached corequisite course. Adherence to these provisions
is essential to maintain the integrity of the registration process.
Instructor Drop Form (Admissions Override)
Examples below (not all listed):


 .
.


